
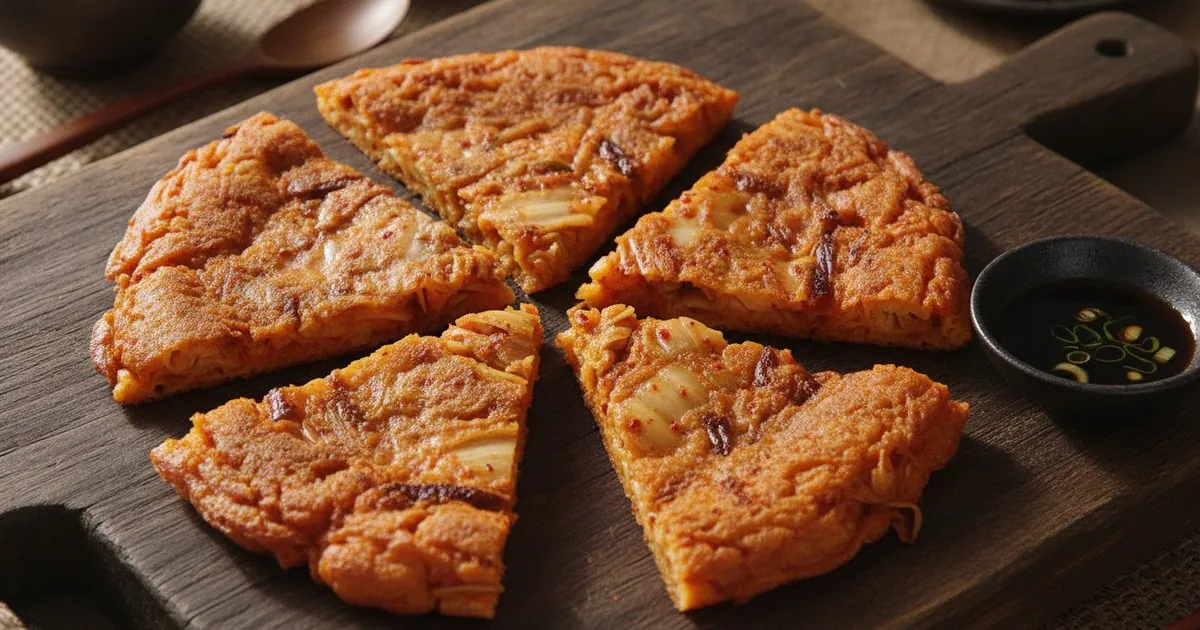
There’s a particular sound that announces kimchi jeon before you even see it: a loud, assertive sizzle the moment batter hits hot oil, followed by the low, steady crackling that tells you a proper crust is forming. That sound — combined with the sharp, fermented tang of kimchi meeting a hot cast-iron pan — is one of the most satisfying moments in Korean home cooking.
Kimchi jeon (김치전), sometimes called kimchi buchimgae (김치부침개), is one of Korea’s most beloved savory pancakes. It’s the food Koreans reach for on rainy days, when they want something comforting without a lot of effort, or when the kimchi at the back of the fridge has gotten pleasantly, pungently sour. The combination of crispy batter and intensely fermented kimchi produces something genuinely greater than the sum of its parts.
This guide covers everything you need to make genuinely crispy kimchi jeon at home — including the batter science that most recipes skip over, exactly what your pan and batter should look, sound, and feel like at each stage, and the specific mistakes that turn this dish from golden and crunchy to greasy and soft.
What Is Kimchi Jeon?
Jeon (전) is the Korean term for pan-fried, batter-coated foods — a broad category that includes pajeon (scallion pancakes), haemul pajeon (seafood pancakes), hobakjeon (zucchini pancakes), and many more. Buchimgae (부침개) is a near-synonym often used specifically for vegetable- or kimchi-based pan-fried cakes. In everyday Korean conversation, both terms appear freely.
Kimchi jeon is eaten across Korea as a snack (anju, often with makgeolli rice wine), a casual meal, or a side dish. There’s a genuine cultural association between rainy weather and the craving for jeon — the sound of rain supposedly resembles the sound of jeon sizzling in a pan, and Korean social media reliably fills with jeon photos every time a rainstorm rolls in. For more on how dishes like this fit into a Korean meal, see our complete banchan guide.
Unlike Chinese scallion pancakes, which are layered, or Indian besan chilla, which uses chickpea flour, kimchi jeon is a simple drop-batter pancake. All the technique lives in the batter consistency, the pan temperature, and oil management — not in elaborate shaping or technique.
Why Well-Fermented Kimchi Is Non-Negotiable
The single most important ingredient decision you’ll make for this dish is the state of your kimchi — and specifically, how fermented it is.
Fresh, recently made kimchi is mild, a little crunchy, and has a bright, clean flavor. That’s excellent alongside grilled meat, but it produces a flat, underwhelming pancake. What kimchi jeon needs is sour, deeply funky kimchi that has been fermenting for several weeks to months. The lactic acid and fermented compounds in well-aged kimchi give the pancake its characteristic pungent, tangy backbone — the flavor that makes people reach for a second piece.
Practically speaking: if your kimchi brine is still mild and sweet-tasting, your jeon will taste mild and sweet. If it smells sharp and funky, almost effervescent — that’s what you want.
The kimchi brine (the liquid in the jar) is itself a key batter ingredient. Several tablespoons go directly into the batter to season it with salt, acidity, and fermented depth all at once. Don’t discard it.
If you’re starting from scratch or want total control over fermentation, our guide to making kimchi at home walks through the full process from salting to fermentation timing.
The Crispy Batter: What Actually Works
Achieving a genuinely crispy kimchi jeon — not just browned, but shatteringly crisp at the edges with a firm, non-gummy center — requires understanding what each batter component contributes.
All-purpose flour is the structural base. It provides gluten for cohesion and body. But flour alone creates a dense, slightly bread-like texture that doesn’t crisp up particularly well.
Potato starch or cornstarch is the crispiness fix. At around ¼ cup / 30 g per 1 cup / 120 g of flour, starch dramatically lightens the crust. Starches gelatinize at lower temperatures than gluten proteins, which means the outer surface sets into a crisp shell faster, before the interior can become rubbery. Potato starch gives a slightly more delicate result; cornstarch is a reliable 1:1 substitute.
Cold water slows gluten development, keeping the batter tender rather than tough. Most experienced recipe developers emphasize using chilled or even ice-cold water. Some recipes use chilled sparkling water, which adds an additional lightness from the carbonation. The key is not using warm or room-temperature water — cooler is consistently better for texture.
Egg: this is a genuine debate. Some recipes include one beaten egg for richness and binding. However, testing by several experienced Korean food bloggers found that omitting the egg actually produces crispier results — eggs add protein and fat that push the texture toward fluffy rather than crisp. Skip the egg for maximum crunch; add one if you prefer a slightly richer, more substantial pancake.
Kimchi brine: 2–3 tablespoons in the batter is a solid starting point, adding flavor, acidity, and liquid. Because kimchi’s own moisture content varies significantly, no recipe can give a perfectly fixed liquid amount. Mix, then adjust with cold water 1 tablespoon at a time. Target consistency: pourable and thick, falling off a spoon in a slow ribbon, with visible body — similar to a slightly loosened American pancake batter.
Ingredients & Sourcing for Western Kitchens
What You’ll Need
For the pancakes (serves 2–3):
- 1 cup / 120 g all-purpose flour
- ¼ cup / 30 g potato starch or cornstarch
- ¾ cup / 180 ml ice-cold water, adjusted as needed
- 2–3 tbsp / 30–45 ml kimchi brine
- 1 to 1½ cups / 150–225 g well-fermented napa cabbage kimchi, chopped into ½-inch / 1 cm pieces
- 3 scallions, cut into 2-inch / 5 cm lengths
- ¼ medium yellow onion, thinly sliced
- 1 tsp gochugaru — optional, for extra heat (see our gochugaru and gochujang guide for sourcing and substitutes)
- ¼ tsp fine salt
- 3–4 tbsp / 45–60 ml neutral oil for frying
For the dipping sauce:
- 2 tbsp soy sauce
- 1 tbsp rice vinegar
- 1 tsp toasted sesame oil
- 1 tsp gochugaru or crushed red pepper flakes
- ½ tsp toasted sesame seeds
- 1 tsp sugar (optional, balances sourness)
Sourcing Notes for US Cooks
- Kimchi: H Mart, Zion Market, and most Asian grocery stores carry multiple brands of refrigerated kimchi with active brine. Whole Foods and Trader Joe’s offer options, but check that the packaging has actual liquid/brine — vacuum-sealed varieties that are very dry won’t give you the brine you need. For fermented character, the Nasoya or Wildbrine brands sold at US natural food stores can work in a pinch.
- Potato starch: H Mart and Asian grocers carry it reliably. Bob’s Red Mill potato starch is available at many US grocery stores and works perfectly. Cornstarch (also labeled Maizena) is a 1:1 substitute.
- Gochugaru: Available at H Mart and Korean grocers. If substituting, mild paprika plus a small pinch of cayenne gets you closer to the color and mild heat, though it won’t replicate the specific fruity flavor of gochugaru.
- Buchimgaru (Korean pancake mix): If you have this pre-seasoned mix from H Mart, you can substitute it for the flour — reduce the added salt and skip any additional seasoning powder since it’s built in.
How to Make Kimchi Jeon: Step-by-Step
Step 1: Make the Dipping Sauce First
Whisk together all dipping sauce ingredients in a small bowl. Setting it aside now gives the flavors time to blend while you cook.
Step 2: Prep the Kimchi
Chop kimchi into ½-inch / 1 cm pieces. If it’s very wet, give it one gentle squeeze over the sink and save that liquid. Don’t wring it dry — some moisture is fine. Very wet, un-squeezed kimchi releases steam inside the pancake as it cooks and softens the crust.
Step 3: Mix the Batter
Whisk flour, starch, and salt together in a large bowl. Add the cold water and 2–3 tbsp kimchi brine. Stir until just combined — lumps are fine, overmixing is not. The batter should pour easily but have real body. If it seems too stiff, add cold water 1 tablespoon at a time.
Step 4: Fold In the Fillings
Add the kimchi, scallions, onion, and gochugaru if using. Fold gently. The finished mixture should look like a thick, vegetable-studded batter — not a bowl of vegetables with a little batter coating them.
Step 5: Get the Pan Properly Hot
This is where most failures start. Heat your skillet — cast iron is ideal; heavy non-stick also works — over medium-high heat for 1–2 minutes before adding oil. Add 2 tablespoons of neutral oil. When the oil shimmers and a drop of batter sizzles audibly and vigorously on contact, you’re ready. A weak sizzle means more preheating is needed.
Step 6: Cook First Side — Don’t Move It
Pour half the batter into the pan and press it into an even circle, roughly ¼ inch / 6 mm thick. Now leave it completely alone for 3–4 minutes. A consistent, confident sizzle should continue throughout. You’ll see the edges go opaque and set. The pancake is ready to flip when it lifts cleanly away from the pan without sticking and the underside is deep, even golden-brown.
Step 7: Flip, Oil the Edges, Press Down
Flip the pancake carefully. Drizzle another ½–1 tbsp of oil around the edges of the pancake. Then press it down firmly with a flat spatula — this improves contact with the pan surface and accelerates crust formation. Cook for another 3–4 minutes.
Step 8: Optional Double Flip
For maximum crispiness, flip once more and cook for 1 additional minute per side. This technique — repeated flipping with pressing — is how Korean home cooks get both sides to genuinely crunchy rather than just browned.
Step 9: Cut and Serve Immediately
Transfer to a cutting board. Rest 1 minute, then cut into bite-sized pieces with kitchen scissors or a sharp knife. Serve immediately with the dipping sauce. The crust deteriorates as it sits, so don’t delay.
Protein Variations Worth Trying
The basic recipe is excellent as written, but kimchi jeon also takes protein additions well. Traditional variations include:
- Canned tuna (3 oz / 85 g, very well drained): Fold into the batter with the kimchi. The savory, umami depth of tuna pairs naturally with kimchi’s tang and is a genuinely common household version.
- Ground or minced pork (3 oz / 85 g): Fold raw into the batter, or briefly brown it before adding. Pork is cited as a traditional addition in historical Korean food sources.
- Squid, cut into thin strips: A haemul (seafood) variation — chewy, briny, and excellent with the fermented kimchi.
Common Mistakes to Avoid
1. Batter That’s Too Thick or Too Thin
Too thick (like cookie dough): the pancake won’t spread and the center will be raw and gummy before the outside browns. Too thin (pours like water): won’t hold together when flipped, and cooks up papery. The target is slow-pourable, like a thick smoothie or a slightly thinned American pancake batter. Since kimchi’s moisture varies batch to batch and brand to brand, you cannot rely on fixed water amounts — adjust cold water 1 tablespoon at a time and check the pour before committing to the pan.
2. Pan Not Hot Enough Before Pouring
A lukewarm pan means the batter absorbs oil and starts to cook from residual heat rather than active frying — the result is greasy and pale rather than crispy and golden. The test is non-negotiable: a small drop of batter must sizzle aggressively on contact. If it just sort of settles in with a quiet hiss, give the pan another 90 seconds.
3. Using Fresh or Under-Fermented Kimchi
Young kimchi releases more free water as it cooks (the cell walls haven’t broken down from fermentation), creating internal steam that softens the pancake. It also lacks the pungent, acidic character that makes kimchi jeon taste like something. Well-fermented kimchi holds together better in the batter and produces dramatically more complex, satisfying flavor. This is the single biggest flavor variable in the recipe.
4. Skimping on Oil — or Adding It Cold
Kimchi jeon requires more oil than a typical Western pancake — it needs to fry its bottom surface, not just conduct heat through a thin coating. Under-oiling produces pale, tough, stuck pancakes. But adding oil to a cold pan is also wrong: cold oil soaks into the batter before the surface can set. Add oil to a preheated pan, let it heat to shimmering, then pour.
5. Lifting or Moving the Pancake Too Early
The most common mistake, and the one that ruins texture. If you try to check the underside or shift the pancake before the crust has fully set, it tears apart. The crust will tell you when it’s ready: the pancake will slide freely when you nudge the pan (no sticking), the edges will be fully opaque, and a spatula slipped under the edge should meet no resistance. Waiting for these signals — rather than checking every 30 seconds — is the entire technique.
6. Serving It Late
Kimchi jeon is a now-or-never dish. The crispy crust that took real effort to build softens within minutes off the heat, going from crunchy to chewy to limp in a surprisingly short window. Have your sauce ready before you start cooking. Cut it immediately, don’t stack pancakes on top of each other while waiting, and if you’re making multiple pancakes, serve each one as it comes off the pan in batches rather than holding them all until the end.
Frequently Asked Questions
Can I make kimchi jeon ahead of time? The cooked pancake really is best eaten immediately. However, you can mix the dry batter ingredients (flour, starch, salt) ahead and store them, and you can mix the full wet batter (without fillings) up to 1 hour ahead and refrigerate it — the cold rest actually helps with crispiness. Add the kimchi and vegetables just before cooking. Leftover cooked pancake can be re-crisped in a dry non-stick skillet over medium heat for 2–3 minutes per side, but it won’t fully recapture the original texture.
My kimchi jeon keeps tearing when I try to flip it. What’s wrong? Two likely causes: the batter is too thin and lacks the structural integrity to hold together as a cohesive pancake, or — more commonly — it isn’t cooked enough on the first side before you attempt the flip. The pancake must be fully set and releasing cleanly from the pan before it can withstand being flipped. If it’s sticking or tearing, give it another 60–90 seconds and test again by gently nudging the edge. It will tell you when it’s ready.
Can I make gluten-free kimchi jeon? Yes. Replace the all-purpose flour with a 1:1 gluten-free flour blend (Bob’s Red Mill 1:1 and King Arthur Measure for Measure both work well here). Keep the potato starch or cornstarch as written. The texture will be slightly more delicate and prone to tearing, so make smaller pancakes (4–5 inches / 10–13 cm diameter) rather than large ones, which are easier to flip without breaking.
What’s the difference between kimchi jeon and pajeon? Pajeon (파전) is a scallion pancake — pa means green onion in Korean. Pajeon can also include seafood (haemul pajeon). Kimchi jeon uses kimchi as the primary filling and has a distinctly more sour, fermented, assertive flavor profile. The batter technique is essentially the same; the distinction is mainly in the primary filling and resulting taste character. Both are excellent and worth having in your Korean cooking repertoire.
What do I do if my kimchi isn’t sour enough? You can accelerate fermentation by sealing your kimchi jar and leaving it at room temperature for 24–48 hours. You’ll notice bubbling activity increase and the brine will become more pungent. Refrigerate after that period. Alternatively, add 1 teaspoon of rice vinegar directly to the batter to approximate some of the sourness. It won’t fully replicate aged kimchi, but it helps.
Kimchi jeon rewards attention to a handful of fundamentals: sour, well-fermented kimchi; cold liquid in the batter; a hot pan with enough oil; and the patience to leave the pancake alone until the crust is genuinely set. Get those four things right and the rest takes care of itself. It’s one of the fastest, most satisfying things to cook in the Korean repertoire — and once you’ve nailed the technique, it becomes the recipe you turn to every time you want something crispy, funky, and undeniably good.