
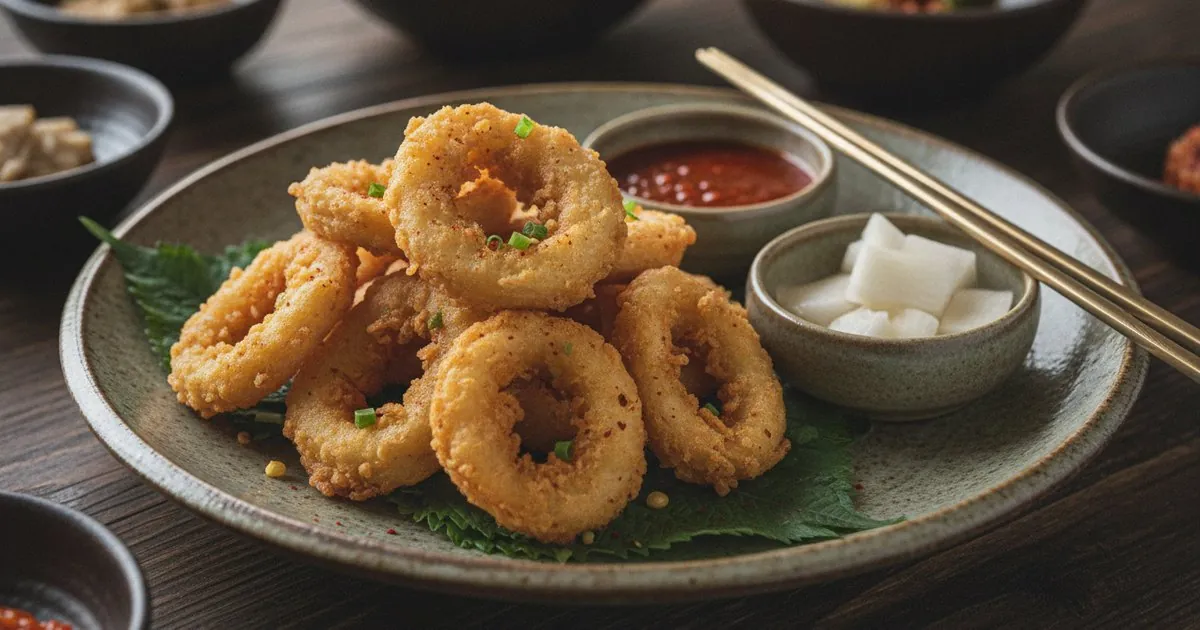
Rings of squid coated in a batter that shatters at the first bite, with a mild sweetness from the seafood and a dark, tangy vinegar-soy sauce for dipping — ojingeo twigim is one of those Korean street foods that seems deceptively simple until you understand the precision behind it. Get the technique right and the results are extraordinary. Get it wrong and you have rubbery squid in a damp, greasy shell.
This guide breaks down everything: the two authentic versions, the batter chemistry, the double-fry technique, and the most common failure modes so you can avoid them. Whether you’re cooking from a Korean grocery haul or improvising with frozen calamari from your local supermarket, this is the recipe to bookmark.
What Is Ojingeo Twigim?
Ojingeo (오징어) is the Korean word for squid, and twigim (튀김) refers to deep-fried, battered food — the same tradition that gives Korean cuisine its full range of golden, crispy snacks, from sweet potato to shrimp to vegetables. Ojingeo twigim is the squid iteration of this technique, and it’s one of the most iconic items sold at pojangmacha (포장마차) — those small, canvas-tented street stalls found across Korea that serve hot food and cold beer well into the night.
What distinguishes it from Western calamari? A few key things: the batter is lighter and crisper, built on cornstarch rather than heavy breadcrumbs; the rings are cut thicker (around 1 cm / ½ inch rather than thin rings); the tentacles are always included; and the dipping sauce is choganjang (초간장) — a clean, bright blend of soy sauce, rice vinegar, sugar, and sesame oil rather than anything tomato-based.
Ojingeo twigim and tteokbokki are natural companions on the Korean street food table. The spicy, chewy rice cakes and the crispy, savoury squid are textural and flavour opposites that complement each other perfectly — if you’re making one for a crowd, consider making both.
Two Authentic Versions Worth Knowing
The name “ojingeo twigim” actually covers two genuinely distinct preparations, and it’s worth understanding both before you cook.
Version A — Fresh Squid (Street/Pojangmacha Style): This is what the name means by default. Fresh or frozen-thawed squid is cleaned, cut, battered, and fried. The flavour is clean, lightly sweet, and oceanic — the batter is the main textural event. This is the version detailed in the full recipe below and the most approachable starting point for home cooks in Western kitchens.
Version B — Dried Squid (Geon-ojingeo Twigim): A beloved home kitchen and anju (안주 — food served alongside drinks) preparation. Dried squid (건오징어, widely sold at Korean grocery stores) is rehydrated in cold water for 4–5 hours until it softens and expands, then patted completely dry, battered, and double-fried. The result is chewier and far more intensely flavoured — concentrated and almost jerky-like. If you want to explore this version, the frying instructions are identical; just plan for a slightly longer first fry (3 minutes rather than 2) due to the denser texture. The double fry is even more essential here.
The Batter Decision: Twigim Garu vs. Homemade
Your first real decision is the batter, and it comes down to one question: do you have access to twigim garu (튀김가루)?
Twigim garu is a pre-mixed Korean frying flour sold at Korean grocery stores like H Mart and online. It already contains cornstarch, baking powder, a touch of salt, and sometimes a little sugar — designed specifically for this application. The shortcut batter is simply 130g (1 cup) twigim garu stirred into 240ml (1 cup) of ice-cold water. For pojangmacha-style results with minimal fuss, this is the professional move.
If twigim garu isn’t available, the homemade batter is barely more work and equally excellent. The standard DIY formula is a roughly 2:1 blend of flour to cornstarch, plus baking powder for lift and club soda (or plain ice-cold water) for the liquid. Using cake flour in place of all-purpose flour reduces gluten formation further, producing a lighter, more delicate shell. The recipe below uses this homemade approach so it’s accessible to everyone.
Stocking a Korean pantry? Our H Mart shopping guide covers every essential ingredient — twigim garu, gochugaru, doenjang, and more — with aisle-by-aisle guidance.
Equipment You’ll Need
- Wok or deep heavy pot (Dutch oven works well): A wok is ideal — its shape allows oil to pool deeply in the centre while the wide surface area gives you easy access. A heavy-bottomed Dutch oven is equally reliable.
- Instant-read or clip-on thermometer: Deep frying without a thermometer is guesswork. Oil temperature is the primary variable between crispy and greasy.
- Spider strainer or slotted spoon: For moving squid quickly in and out of the oil.
- Wire rack set over a rimmed baking sheet: This is where you drain. Not paper towels — a wire rack allows air to circulate under each piece, keeping the bottom crispy rather than steaming it soft.
How to Make Ojingeo Twigim
Step 1: Clean and Prep the Squid
If you’re working with whole fresh squid, the cleaning process is straightforward once you’ve done it once. Grip the mantle (the tube-shaped body) in one hand and the head and tentacles in the other, and gently but firmly pull them apart — the head and internal organs come away cleanly. Reach inside the mantle and pull out the quill, a transparent, feather-shaped piece of cartilage that runs the length of the body. It looks like a piece of clear plastic and slides out easily. Discard it.
Peel the purple-pink skin from the outside of the body tube under a trickle of cold running water. It comes away in strips — grip a corner and peel it back. Rinse the inside and outside of the tube thoroughly.
For the tentacles: cut them away from the head by slicing just above the eyes, so the tentacles stay in a connected cluster. Pinch the base of the tentacle cluster and squeeze out the beak — a small, hard, round nub — and discard it.
If using pre-cleaned frozen calamari: Thaw it overnight in the fridge (not in warm water), rinse under cold water, and skip directly to drying. Frozen calamari is a completely legitimate choice and produces excellent results.
Now, the step most home cooks underestimate: Pat everything bone dry. Use paper towels and press firmly — don’t just blot. Squid holds a lot of surface water, and wet squid causes batter to slide off, creates dangerous oil splatter, and produces a steamed rather than fried texture.
Step 2: Cut and Season
Slice the body tube into rings about 1cm (½ inch) wide. If any tentacle clusters are particularly large, cut them in half. Season the pieces lightly with salt and a grind of black pepper, toss to coat, then spread them out and pat dry a second time. This second drying isn’t pedantic — squid releases additional liquid after it’s salted, and that liquid needs to go before the batter goes on.
Step 3: Make the Batter
In a medium bowl, whisk the flour, cornstarch, baking powder, salt, and pepper together until evenly combined. Add your ice-cold water or club soda gradually, stirring with chopsticks or a fork. Stop the moment the dry streaks have just disappeared — small lumps are not only acceptable, they’re correct. The batter should be thin enough to coat the back of a spoon in an even, see-through-ish layer.
The two cardinal batter sins: overmixing (develops gluten, produces a tough, chewy coating) and letting it warm up (a warm batter won’t create the violent steam burst that makes the coating puff and shatter). Nest your batter bowl in a larger bowl of ice water immediately after mixing, and keep it there throughout the entire frying session.
Step 4: Dredge and Fry — First Pass (175°C / 350°F)
Spread 2 tablespoons of dry all-purpose flour on a plate. Working in small batches, dust each piece of squid in the dry flour and tap off the excess. This thin flour coat is the primer — it gives the batter something to adhere to rather than sliding straight off the wet squid. Dip each floured piece into the cold batter and let the excess drip back into the bowl.
Heat your oil in the wok or pot to 175°C (350°F). Confirm with a thermometer. Carefully lower battered squid pieces into the oil — about 6–8 rings at a time, never more than a single loose layer. Fry for approximately 2 minutes, turning once, until the batter turns pale gold and feels set when you nudge it gently. It should be a light, dry-looking golden colour at this stage, not deeply browned.
Remove with a spider strainer and drain on the wire rack. Let them rest for 3–4 minutes minimum. This rest is structural — the carryover heat finishes cooking the squid through without overcooking the exterior, and the steam equalises inside the coating before the second fry drives it out.
Step 5: Second Fry (190°C / 375°F) — The Crunch Fry
Raise the oil temperature to 190°C (375°F). Return the rested squid to the hot oil in batches for 1–2 minutes more. Watch the colour: it should go from pale gold to a rich, even amber-brown. The auditory cue is equally reliable — when you hold a piece near your ear and hear a distinct, sustained crackling, the moisture inside the coating has been driven off and the crust has set properly. That sound means crunch.
Drain again on the wire rack. Serve immediately.
Step 6: The Dipping Sauce
While the squid drains, stir together 3 tbsp soy sauce, 1 tbsp rice vinegar, 1 tsp sugar, 1 tsp sesame oil, and a pinch of gochugaru in a small bowl until the sugar dissolves. The flavour profile should be tangy and savoury first, then a warm sesame note at the finish, with just enough sweetness to balance the acid. Taste and adjust — more vinegar for brightness, more sugar to mellow it out.
Variations and Serving Ideas
- Spicy gochujang sauce: Mix 2 tbsp gochujang, 1 tbsp rice vinegar, 1 tsp honey, and ½ tsp sesame oil for a thicker, spicier dipping option. Our gochujang guide covers which brands to use and how to dial in the heat level.
- Seasoning salt (pojangmacha style): Some street vendors skip the sauce entirely and serve a small cup of fine salt mixed with white pepper and a pinch of paprika for dry-dipping. Simpler and excellent.
- Make it a seafood spread: Ojingeo twigim pairs beautifully with haemul pajeon (Korean seafood scallion pancake) for a Korean seafood feast — the two dishes use similar ingredients and both benefit from the choganjang sauce.
- Dried squid variation: Rehydrate 100g (3.5 oz) dried squid in cold water for 4–5 hours. Pat completely dry and proceed from Step 2. Budget for a 3-minute first fry given the denser texture.
Sourcing Guide for Western Kitchens
- Fresh squid: Your best source is an Asian grocery store — H Mart, 99 Ranch, and most Chinese or Vietnamese supermarkets stock whole fresh squid reliably, often at very reasonable prices. Ask at the fish counter if it’s not in the case.
- Frozen cleaned calamari: Available at Whole Foods (often in the frozen seafood section), Trader Joe’s, and most large mainstream supermarkets. A solid substitute. Thaw overnight in the fridge.
- Twigim garu: H Mart and Korean grocery stores carry several brands (Beksul and Wang are common). Also available on Amazon. If it’s not accessible, the homemade batter above is the answer.
- Gochugaru: Essential for the optional kick in the dipping sauce. Our dedicated gochugaru guide covers brands, coarseness levels, and where to find it — including non-Korean grocery store options.
- Rice vinegar: Readily available in the Asian foods aisle of most grocery stores, or in the regular vinegar section. Unseasoned is preferable here.
Common Mistakes to Avoid
1. Not Drying the Squid Thoroughly Enough
This is the number-one failure mode for ojingeo twigim, and it’s responsible for multiple downstream problems: batter that slides off in patches rather than adhering evenly, oil that spatters violently when wet squid hits it, and a coating that steams from underneath rather than frying, producing a greasy, pale, soft result instead of a crispy one. The fix is simple but must be taken seriously — pat dry at least twice: once immediately after cleaning and cutting, and again after the squid has been seasoned and rested for 5 minutes. Press firmly with paper towels; a gentle blot doesn’t cut it.
2. Overmixing the Batter
If your batter looks glossy, smooth, and fully uniform, you’ve gone too far. Overmixed batter has developed gluten, and gluten produces a coating that fries up tough, dense, and chewy rather than crisp and light. The visual target is a batter that still has small lumps and an almost slightly broken appearance — like pancake batter made by someone who didn’t care very much. Mix with a fork or chopsticks and stop the moment the dry ingredients are mostly incorporated.
3. Overcrowding the Oil
Adding too many pieces at once causes the oil temperature to drop sharply — you can watch this happen in real time on your thermometer. When the oil is too cool, the batter doesn’t immediately sear and seal; instead it sits and absorbs oil, resulting in a heavy, greasy coating that never achieves crunch. A good rule of thumb: the oil should recover to your target temperature between each batch within about 90 seconds. If it’s taking longer, you’re overcrowding. Fry in smaller batches and be patient.
4. Skipping the Double Fry
If you’re tempted to skip the second fry and just cook the squid longer in a single pass — don’t. Frying longer at the same temperature causes the squid itself to overtighten and turn rubbery before the coating has time to fully crisp. The two-stage fry exists for a reason: the first fry (lower temperature) sets the batter and gently cooks the squid; the second fry (higher temperature) drives off the residual moisture trapped in the coating and builds genuine crunch. You cannot replicate that result with a longer single fry.
5. Letting the Batter Warm Up
A batter that has been sitting at room temperature for 15–20 minutes is no longer cold enough to create the rapid, expansive steam burst that makes the coating puff. Cold batter hitting hot oil is a dramatic thermal contrast — that shock is what produces the light, cratered, crispy texture. Warm batter hitting hot oil is just… frying, and the result is denser and less crisp. Keep your batter bowl nested in ice water throughout your cooking session, and add a fresh ice cube if it starts to feel room temperature.
6. Draining on Paper Towels
Paper towels trap steam underneath each piece of squid, softening the very bottom of the coating you worked to create. A piece drained on paper towels will be crispy on top and slightly soft underneath — a fixable problem if you catch it, but why create it? Always drain on a wire rack so air circulates on all sides. This is one of those small habits that makes a visible difference in the final result.
Frequently Asked Questions
Can I use frozen calamari instead of fresh squid?
Yes — and for most Western home cooks, frozen cleaned calamari is actually the more practical choice. It’s widely available, already cleaned, and thaws quickly in the fridge overnight. The end result is nearly indistinguishable from fresh as long as you thaw it properly (always in the fridge, never in warm water, which makes squid rubbery) and dry it extremely well before battering. When buying, look for rings that are opaque white and firm, not translucent or releasing a lot of liquid — that’s a sign of poor quality or improper freezing.
What makes Korean twigim batter different from Italian calamari or Japanese tempura?
Tempura batter is the most delicate of the three — made with egg yolk, very cold water, and minimal mixing, producing an almost translucent, lacy shell. Western calamari typically uses a heavier dredge of seasoned flour or breadcrumbs. Korean twigim batter sits between the two: slightly thicker and sturdier than tempura, lighter than breadcrumbed calamari. The cornstarch content is high, which is what gives it that particular shattering quality — cornstarch doesn’t form gluten, so the crust stays tender-crisp rather than tough.
How do I keep ojingeo twigim crispy if I’m serving it for a group?
Place fried pieces on a wire rack over a baking sheet in a low oven — 110°C (225°F) — to hold for up to 20–25 minutes without significant softening. Don’t cover them or put them in a sealed container; trapped steam is the enemy. That said, twigim really is at its best within the first 5–10 minutes of frying. If you’re cooking for guests, consider frying in sequential small batches close to serving time rather than frying everything ahead.
Can I make ojingeo twigim in an air fryer?
You can, with adjusted expectations. Lightly spray battered squid with oil and air-fry at 200°C (390°F) for 8–10 minutes, flipping halfway through. The batter won’t puff and bubble in the same way — you lose the dramatic thermal-shock texture — but you’ll still get a pleasantly crisp, browned coating. It’s a reasonable lower-oil alternative for weeknight cooking but not what you’d serve as a showstopper.
What should I serve alongside ojingeo twigim?
The classic Korean street food pairing is tteokbokki — the contrast between spicy, saucy rice cakes and crispy fried squid is part of the experience. A cold Korean beer (Hite or Cass are traditional) or a small cup of makgeolli (milky rice wine) are ideal drinks. If you’re building out a larger Korean spread, ojingeo twigim works beautifully as part of an anju table alongside pickled vegetables or a simple bowl of kimchi. The choganjang dipping sauce doubles as a sauce for other twigim items, so consider frying a mix of sweet potato, zucchini, and squid together.