
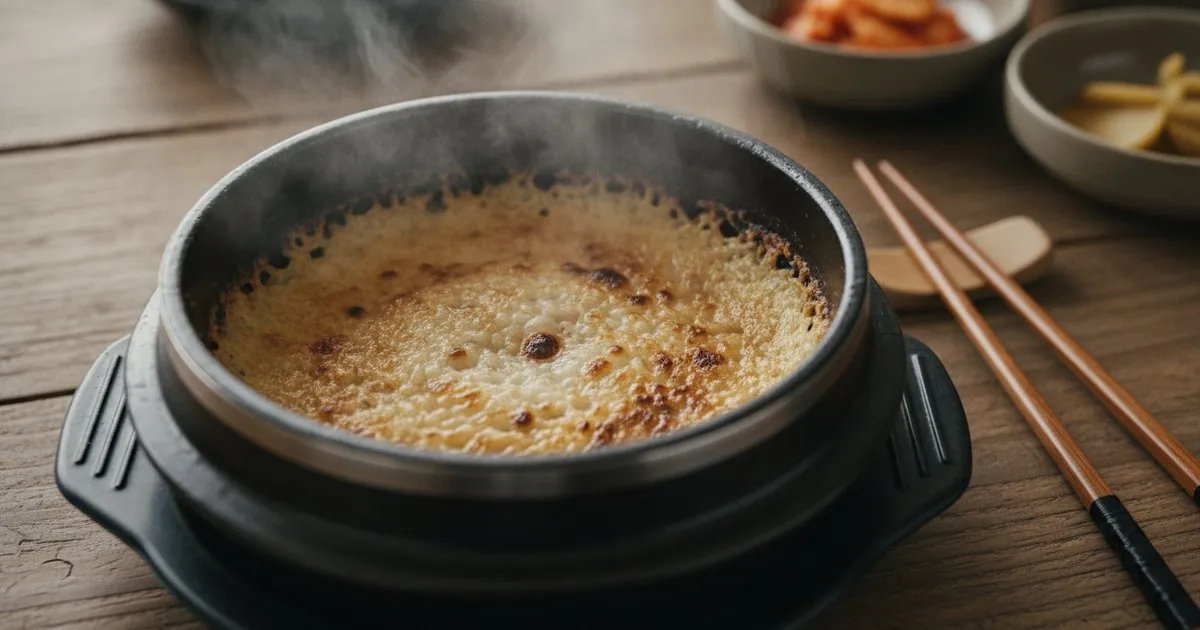
In Korean cooking, the bottom of the rice pot has always been prime real estate. What cooks in other culinary traditions might treat as an accident — rice sticking and scorching — Korean cooks have elevated into something genuinely treasured. That golden, crackling layer clinging to the base of the pot is nurungji (누룽지), and it has its own devoted fans, its own snack aisle presence in Korean supermarkets, and a centuries-long paper trail of people specifically seeking it out.
This guide covers everything: the history and cultural context, where to source the right rice outside Korea, three practical methods for making nurungji at home (traditional stovetop, modern air fryer, and a pan-fried skillet version), and how to turn the same scorched pot into sungnyung (숭늉) — the warm, toasty rice tea that traditionally closes a Korean meal the way an espresso or digestif might close a Western one.
What Is Nurungji — And Why Does It Taste So Good?
The word nurungji (누룽지) derives from the Korean verb nulda (눌리다), meaning to be pressed down or scorched under heat. It refers specifically to the thin, caramelized crust of rice that forms in direct contact with a hot pot surface. In texture it sits somewhere between a rice cracker and a very thin, dry rice cake — crisp when fresh, pleasantly chewy when briefly softened in liquid, and unmistakably nutty and toasty throughout.
The culinary history runs deep. Scorched rice dishes appear in Korean texts from the Joseon dynasty period, and the renowned 17th-century Korean medical encyclopedia Dongui Bogam (동의보감) already documented sungnyung — the hot water poured into the scorched pot — as a warming, digestive drink valued in aristocratic households. The practice of drinking the pot-rinsing water wasn’t born of frugality alone; it was a considered cultural tradition that honored rice as precious and believed the toasted residue carried digestive benefit.
Korea isn’t unique in celebrating scorched rice — Persian tahdig, Spanish socarrat, Filipino tutong, Chinese guoba, and West African kanzo all elevate the same principle — but what makes nurungji distinctive is its specific use of short-grain rice, its deliberate thinness, and the integrated tradition of the sungnyung tea that follows.
What Rice to Use — And Where to Find It in Western Countries
Korean short-grain white rice (백미, baekmi) is the correct choice. Its higher starch content means the grains naturally bond together during cooking and adhere to the pot in a cohesive layer — exactly what you need for a crust that lifts off in intact sheets rather than scattered dry grains.
Where to buy it:
- H Mart or any Korean/Asian grocery store: Any bag labeled Korean short-grain rice, Koshihikari-origin rice, or simply “sushi rice” will work perfectly. Brands like Chungcheong, Hanareum, or CJ are all reliable.
- Whole Foods, Sprouts, or mainstream supermarkets: Japanese short-grain varieties (Nishiki, Tamaki Gold, Lundberg Sushi Rice) are identical in behavior and an excellent substitute.
- Online: Koda Farms Kokuho Rose or any Koshihikari variety ordered through Amazon works well for nurungji.
What NOT to use: Long-grain rice — jasmine, basmati, Carolina long-grain — will not form a proper crust. The grains don’t bond together the same way, and you’ll end up with scattered, individually dried bits rather than a continuous sheet. Medium-grain is acceptable; short-grain is ideal.
If you want to commit to the full traditional experience, a dolsot (돌솥) — the Korean stone pot — is available at most H Mart locations and online. Its porous, heat-retaining surface creates an especially dramatic, thick crust and is the same vessel used for dolsot-style bibimbap. That said, a regular stainless steel pot or cast iron pan works excellently, and a nonstick skillet is the most forgiving entry point for beginners.
Three Methods for Making Nurungji
Method A: Traditional Stovetop — The Authentic Approach
This is the method that produces the most complex flavor and the most traditional result. Budget about 65 minutes total (only about 30 of those are hands-on), and you’ll also have sungnyung ready to go from the same pot.
You’ll need: 200g (1 cup) Korean or Japanese short-grain white rice, 240ml (1 cup) water for cooking, 480ml (2 cups) water for sungnyung.
Wash and soak. Rinse the dry rice in cold water 3–4 times, swirling it between your palms, until the runoff is nearly clear. Then cover with 240ml (1 cup) fresh water and soak for 30 minutes. This step is worth the time — properly hydrated rice cooks evenly, which means the bottom layer dries and crisps at a consistent rate rather than burning in patches while the center stays soft.
Cook the rice. Bring the soaked rice and its water to a boil over medium-high heat, covered, about 5 minutes. The moment you see a steady plume of steam from the lid, cut the heat to its absolute lowest setting. Cook 10 minutes without lifting the lid, then remove from heat and rest (lid on) for 5–10 minutes.
Form the thin layer — the most important step. Fluff the cooked rice, then scoop out most of it, leaving only a thin, even coating across the entire pot bottom. Think of it as a rice veneer, not a layer. If the coating looks borderline too thin, that’s correct. Too thick, and the inside steams soft while the outside browns, giving you chewy-scorched rather than crisp-toasted.
Scorch over medium-low heat, lid off. Return the pot to medium-low heat with no lid. Cook undisturbed for 12–18 minutes. The sensory progression tells you where you are: quiet sizzling in the first eight minutes, a shift to a toasted-popcorn or light-caramel aroma around minute 10, and by minutes 14–18 the edges will visibly contract from the pot walls and a spatula slipped beneath a corner will find the crust pulling away cleanly in a golden sheet. That golden-to-amber color with a dry, non-greasy surface is what you’re after. When it smells like toasted grain rather than burning, you’re on track.
Serve or proceed to sungnyung. Let the nurungji rest for 2 minutes before handling — it crisps further as it cools.
Method B: Air Fryer Nurungji — Best for Leftover Rice
If day-old short-grain rice is already sitting in your fridge, this method is ready in under 15 minutes and produces a reliably even, cracker-like result. Cold leftover rice works better here than fresh because the drier surface crisps faster and more uniformly.
You’ll need: 270g (1½ cups) cold, day-old cooked short-grain rice. No oil required.
Spread the cold rice in a thin, even layer — about 5–6mm (¼ inch) — on a parchment-lined air fryer tray or basket. Air fry at 200°C (390°F) for 10–14 minutes. Check at the 10-minute mark: the surface should be turning golden and the edges pulling up slightly. It will crisp further as it cools on the counter, so pull it slightly before it looks fully done.
The air fryer result is slightly more uniform in color than stovetop and considerably easier to control, but it lacks the deep, toasted-pot flavor that comes from sustained contact with a hot metal surface. Think of it as nurungji-adjacent rather than the real thing — still delicious, especially broken into pieces and added to a bowl of hot broth.
Method C: Pan-Fried Skillet Nurungji — The Snack Version
This produces individual rice patties with a lacquered surface — more of a crispy rice snack in the style you might find at a Korean street food stall than traditional nurungji, but the texture is outstanding and it pairs beautifully with strong flavors.
You’ll need: 400g (~2½ cups) day-old cooked short-grain rice; 5–10ml (1–2 tsp) neutral oil; 45ml (3 tbsp) light soy sauce; 36g (3 tbsp) sugar. Optional: 2 sheets nori, cut into squares.
Lightly oil a wide cast iron or non-stick skillet over medium heat. Press the cold rice into flat, round patties about 1cm (½ inch) thick and place them in the pan without crowding. Cook 5–7 minutes per side until deeply golden and crackling when pressed. Meanwhile, simmer soy sauce and sugar in a small pan for 2–3 minutes until lightly syrupy. Brush over the hot patties immediately out of the pan. Press a nori square onto each if using.
These are sensational alongside cold beer, and they hold their own next to bold flavors — try them as part of a spread when you’re doing Korean BBQ at home.
Making Sungnyung (숭늉): Korean Scorched Rice Tea
The sungnyung is made in the same pot, immediately after the nurungji is removed — no extra dishes, no extra effort. What you’re working with is the thin layer of toasted residue still clinging to the pot bottom, and that residue is all the flavor you need.
Pour 480ml (2 cups) of water directly into the pot. Place over medium heat and use a wooden spoon or spatula to scrape up the toasty bits as the water heats. Let it come to a gentle simmer and hold it there for 3–5 minutes. The water will turn pale honey-gold and the aroma will be gently smoky and nutty — something in the register of very lightly roasted barley tea or hojicha, but milder.
Taste before serving. It should be clean, subtly toasty, and faintly sweet — not bitter, not acrid. If it’s bitter, the nurungji was scorched too dark (see Mistakes section). Ladle into cups or small bowls and serve warm at the end of the meal.
Traditionally in Korean households, sungnyung closes a meal not as an afterthought but as the considered final note — a warm, digestive palate cleanser that transitions the table away from the intensity of fermented, salted, and spiced banchan side dishes. For a primer on what those side dishes look like, our banchan guide is a good place to start.
Serving and Storing Nurungji
Serving ideas:
- Eat it plain while still warm — it needs nothing, and that’s the point
- Break into pieces and simmer briefly in water or light stock for nurungji-guk (누룽지국) — a soothing, minimal soup, excellent when you want something light
- Drizzle with honey and a pinch of toasted sesame seeds for a simple dessert
- Crumble over congee or juk for added texture
Storage:
- Room temperature in an airtight container: Up to 3 days. Re-crisp in a dry pan over medium heat for 2–3 minutes, or in a 180°C (350°F) oven for 4–5 minutes.
- Freezer: Up to 1 month. Toast straight from frozen in a 180°C (350°F) oven for 5–6 minutes.
- Sungnyung: Does not store well — the toasty, freshly-brewed quality fades quickly. Make it fresh from the pot each time; it takes under 5 minutes.
Common Mistakes to Avoid
1. Leaving the Bottom Layer Too Thick
This is the single most common failure. If you leave more than a thin veneer of rice at the bottom before starting the scorching phase, the interior layers trap moisture and stay soft while the direct-contact surface over-browns. You end up with something chewy and slightly charred rather than uniformly crisp. The fix is simple but requires commitment: after scooping out the bulk of the cooked rice, keep going. The remaining layer should be barely visible — a few millimetres at most. If you can just see the pot’s surface color through it in spots, you’ve hit the right thickness.
2. Cooking the Scorching Phase with the Lid On
Trapping steam over the thin rice layer is a guaranteed failure mode. Steam keeps the surface moist, preventing any crust formation — the result is a pale, soft mat of rice with zero crunch. Once you start the scorching phase, the lid comes off and stays off. This is non-negotiable regardless of which method you use.
3. Using Too Much Heat
Medium or medium-high heat during the scorching phase chars the surface before the interior has time to dry out properly. You’ll know this has gone wrong when the aroma turns acrid and sharp rather than staying pleasantly toasty — think burnt toast versus toasted bread. The correct setting is medium-low with genuine patience. On a powerful burner or induction cooktop, use the smallest ring and the lowest numerical setting. If the pot seems to be coloring too fast in the first five minutes, cut the heat further.
4. Using Long-Grain Rice
Long-grain varieties — jasmine, basmati, any standard American long-grain — simply don’t bond together the same way as short-grain rice during cooking. When scorched, they produce scattered individual grains rather than a cohesive crust you can lift in a sheet. There’s no technique adjustment that compensates for this. If you can only find long-grain, the air fryer patty method (Method B pressed flat) gets closer, but the stovetop traditional method will always fall short with the wrong rice.
5. Scorching the Nurungji Too Dark, Then Attempting Sungnyung
If the nurungji develops past golden amber into dark brown or black, the Maillard compounds responsible for toasty flavor have broken down into bitter, acrid ones — and boiling water through those residues will produce bitter sungnyung no matter how much you dilute it. The diagnostic smell is key: correctly done nurungji smells like toasted popcorn or warm caramel; over-scorched nurungji smells like burnt toast. If you’ve gone too far, skip the sungnyung for that batch. Clean the pot, start fresh, and reduce the heat next time.
6. Skipping the Post-Cook Rest
The 5–10 minute resting period (lid on, heat off) after cooking the rice is not filler time. During the rest, the grains finish hydrating from the trapped steam and the moisture in the pot redistributes evenly. Skipping this and going straight to the scorching phase means the thin bottom layer starts its drying process while still holding excess moisture from unfinished cooking — the result is uneven crisping, with some sections turning golden and others remaining pale and soft well past the expected time window.
Frequently Asked Questions
Can I make nurungji in a rice cooker?
Standard rice cookers are specifically engineered to prevent the bottom from scorching — it’s the core problem they were designed to solve. You cannot produce nurungji in a regular rice cooker. Some higher-end Korean models (certain Cuckoo and Cuchen lines) include a dedicated nurungji mode (누룽지 모드) that intentionally allows controlled scorching, but for any standard appliance, the stovetop or air fryer methods in this article are your routes.
Is nurungji the same thing as the crispy rice at the bottom of dolsot bibimbap?
Yes and no. The stone pot (dolsot) in dolsot bibimbap produces nurungji through the same mechanism — direct contact between cooked rice and a very hot surface — but in the bibimbap context it’s incidental to the dish, and the crust is typically thicker and more heavily seasoned by the surrounding ingredients and oil. Nurungji made intentionally is thinner, purer in flavor, and usually unseasoned. They’re the same phenomenon in different contexts. For everything you need to know about dolsot bibimbap itself, our full bibimbap guide covers it in detail.
My nurungji came out pale and soft, not golden. What went wrong?
Three likely culprits: the rice layer was too thick, the heat was too low (or the burner wasn’t producing consistent heat), or the lid was left on. Check all three before the next attempt. Also note that 10 minutes is the minimum end of the scorching window — on many home stoves, especially electric coils, it takes 16–18 minutes for a properly thin layer to turn golden. Don’t pull it early just because time has passed; trust the color and aroma over the clock.
Can I use brown rice for nurungji?
Brown rice works, but it requires adjustments. Soak for at least 1 hour rather than 30 minutes, increase cooking time, and budget 20–25 minutes for the scorching phase. The resulting crust is thicker, denser, and earthier in flavor — less delicate than short-grain white rice nurungji, but with a deeper, more complex nuttiness. The sungnyung from a brown rice batch is particularly robust and satisfying on a cold day.
What does nurungji taste like if I’ve never had it?
The closest Western reference point is the bottom crust of a rice pilaf or the crisp base of a well-made paella (socarrat) — toasted, nutty, with a faint caramel sweetness from the Maillard browning. The texture when freshly made is dry and crackling, similar to a thin rice cracker but with more irregular, hand-made character. Sungnyung made from it tastes like very lightly roasted barley or wheat tea — warm, clean, and gently smoky without any bitterness if the crust was done correctly. Neither flavor is intense; both are the kind of thing you find yourself coming back to more than expected.