
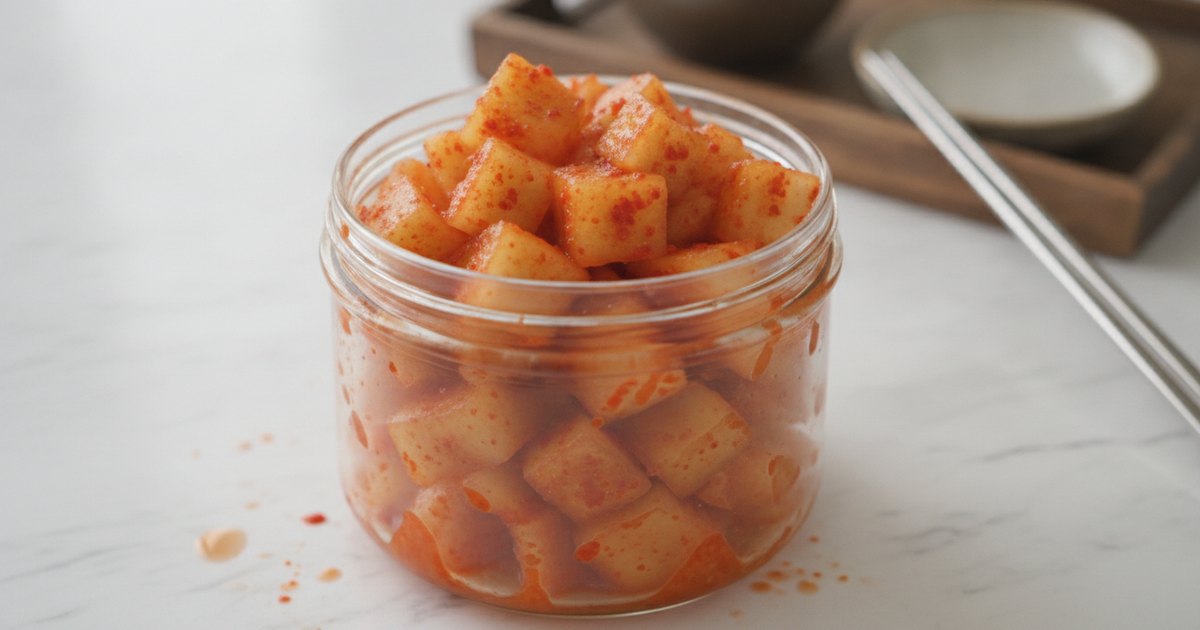
There's a reason kkakdugi (깍두기) often gets called the gateway kimchi. If the idea of wrestling a whole head of napa cabbage, spreading paste between dozens of leaves, and spending an afternoon in rubber gloves has felt like too much of a commitment, kkakdugi is where you start. Cut Korean radish into cubes, salt it for an hour, toss with a punchy chili paste, and the active work is done. The whole hands-on process takes under half an hour, and the result is one of the most satisfying things you can put next to a bowl of rice.
Kkakdugi has a completely different personality from baechu (cabbage) kimchi: crunchier, chewier, slightly sweet from the radish's natural sugars, and assertively spicy. The cubes hold their texture for weeks in the refrigerator — longer than cabbage kimchi, which tends to soften more quickly. If you've ever eaten gomtang (Korean ox-bone soup) or seolleongtang at a Korean restaurant, the small bowl of kkakdugi placed alongside isn't an afterthought. That pairing is practically liturgical: the milky, mild soup against the sharp, spicy crunch of cold radish kimchi is one of the most considered flavor contrasts in Korean food.
This guide is written for Western home cooks who want the full picture: what to look for at an Asian grocery store, which substitutes are workable and which aren't, and exactly what each stage of the process should look, feel, and smell like so you know you're on track.
What Is Kkakdugi, Exactly?
Kkakdugi is a style of kimchi made from Korean radish (무, mu) cut into small cubes — the name is an onomatopoeia of sorts, derived from kkakduk-kkakduk, evoking the sound and motion of cubing. Like all kimchi, it is a lacto-fermented food: coarse salt draws water out of the vegetable, creating a brine in which naturally occurring Lactobacillus bacteria proliferate and produce lactic acid, giving kimchi its signature tang.
The cubing approach, compared to whole-leaf kimchi, means there's no need to salt overnight, no paste-spreading between individual leaves, and a more straightforward ratio of seasoning paste to vegetable. The process is faster and less technical, and the finished product stays crunchy far longer. For the wider story of how kimchi is made and what makes each variety distinct, our complete guide to making kimchi at home is a good place to start.
The Star Ingredient: Korean Radish (Mu 무)
Korean radish is not the same thing as Japanese daikon, though daikon is the best widely available substitute. Korean mu is shorter and more squat, often with a greenish tinge at the shoulder where it was exposed to light, and has notably firmer, denser, and slightly sweeter flesh than daikon. That density is what gives kkakdugi its prized crunch — the cube that audibly snaps when you bite it.
How to pick a good one: The single most important quality indicator is weight. Pick up the radish and feel it — it should be noticeably heavy for its size. A light radish often has internal air pockets or dry, spongy flesh that produces mushy kkakdugi no matter how well you execute the recipe. The skin should be smooth and firm, not wrinkled or soft-feeling. Kimchimari's guidance on this is worth repeating: avoid radishes with rubbery skin or a hollow sound when tapped.
Seasonality matters: Korean radish is at its best in fall and winter. Cold growing conditions concentrate the natural sugars and keep bitterness low. Summer radishes can carry a bitter edge — not ruinous, but noticeable.
Where to find it: H Mart and most Korean grocery stores carry mu year-round, labeled as Korean radish. If you're not near an H Mart, look in any Asian grocery store — Chinese or Japanese markets often carry it too. Daikon is your best substitute; use the same weight and watch the salting step carefully (daikon releases moisture more readily than mu). Turnips can work in a pinch but produce a more pungent, earthy result.
Ingredients: What You Need and Why
Gochugaru (고추가루): The Non-Negotiable
Korean coarse-grind chili flakes are essential — not a preference, but a requirement. They have a mild-to-medium heat level, a distinctive sweetness, and a fruity, slightly smoky flavor that regular crushed red pepper flakes or cayenne simply don't replicate. Gochugaru is also what gives kkakdugi its vivid red color. Find it at H Mart, most Asian grocery stores, or online. Buy the coarse grind specifically; the fine powder (used in pastes and soups) will turn your kkakdugi muddy rather than textured.
For more on the role of gochugaru and its fermented cousin gochujang in Korean cooking, our gochujang guide covers both in depth.
Korean Anchovy Fish Sauce (멸치액젓) and Salted Fermented Shrimp (새우젓)
Most kkakdugi recipes use both of these, and the combination is intentional: each provides a different dimension of umami. The anchovy fish sauce (myulchiaekjeot) contributes a deep, earthy savoriness — it's earthier and less sweet than Thai fish sauce, though a good Thai fish sauce like Tiparos can substitute in a pinch (use slightly less, as saltiness varies). The salted fermented shrimp (saeujeot) add a sweet, briny complexity that fish sauce alone doesn't replicate.
Both are sold refrigerated at Korean grocery stores. If you can't find the fermented shrimp, it's better to omit them entirely than to substitute — the result will be good, just a little less layered.
Korean Coarse Sea Salt (천일염, Cheonilyeom)
Korean sun-dried sea salt — specifically the kind with the bittern (the bitter-tasting mineral concentrate) removed during processing — is the ideal choice. If you're using a different coarse sea salt, note that salt density varies significantly by brand and grain size, so weighing rather than measuring by volume is the reliable approach. The one consistent rule across all sources: avoid iodized table salt. The iodine can affect the flavor of the fermented product and may interfere with fermentation quality. Coarse kosher salt (Diamond Crystal works well) or non-iodized sea salt are workable alternatives.
Step-by-Step Method
Step 1: Cube the Radish
Peel the radish and cut it into cubes of about 2 cm (¾ inch) on each side. Consistency matters here: if your cubes range from thumbnail-sized to golf-ball-sized, the smaller ones will take on much more salt and soften during the rest, while the larger ones will be under-seasoned. Use a sharp knife — radish is dense and a dull knife is both slower and less safe.
Step 2: Salt and Rest
Add the salt and 1 tablespoon of sugar to the radish cubes in a large bowl, then toss until every surface is coated. Leave the bowl at room temperature for 45 to 60 minutes, tossing once at around the halfway mark.
At 45 minutes, check the state of your radish. You should see a meaningful pool of liquid at the bottom of the bowl — that's the free moisture the salt has drawn out. Press a cube between your fingers: it should yield slightly, giving a small amount, but still have a firm resistance at the center. Think of it as "tender-crisp" rather than either "crunchy raw" or "soft cooked." This is the texture window you want. If the cubes feel completely limp and waterlogged, they've gone too long or were over-salted.
Step 3: Drain Without Rinsing
Tip the radish into a colander and let it drain for 5 to 10 minutes. Shake the colander occasionally to help the excess liquid fall away. Do not rinse. The residual salt clinging to the cubes is part of the final seasoning and helps create the brine environment the paste needs. If the cubes look very wet, a gentle blot with a paper towel is fine; you're removing surface water, not washing anything away.
Step 4: Make the Paste
While the radish drains, stir together the gochugaru, minced garlic, grated ginger, fish sauce, fermented shrimp, and the remaining half tablespoon of sugar in a small bowl until you have a thick, uniform paste. The smell at this stage should be assertive — deeply savory, pungent from the garlic and shrimp, and spicy. A flat-smelling paste is usually a sign that the fish sauce or shrimp is stale; these are the primary umami drivers in the recipe.
Step 5: Season the Radish
Add the drained radish and the green onion pieces to a large bowl, then add the paste. Put on disposable gloves before you start — gochugaru oil is a stubborn dye that will stain your hands orange-red and last for a full day or two of washing. Using your gloved hands, toss and massage the paste into the radish until every cube is covered in a uniform, vivid red coating. Visible pale patches mean the paste hasn't been worked in fully.
Taste a cube now. It will taste aggressively salty and spicy — significantly more so than a finished, fermented kkakdugi should be. That is the right call. Over the next 12 to 48 hours, fermentation will soften the salt perception, partially consume the sugars, and bring everything into a more cohesive, rounded balance.
Step 6: Pack and Ferment
Pack the seasoned radish firmly into a clean glass jar or airtight container, pressing down firmly as you go to eliminate any air pockets. Leave at least 2.5 cm (1 inch) of headspace — more liquid will accumulate as fermentation progresses, and trapped gas needs room.
Fermentation guide:
- 12–24 hours at room temperature (18–22°C / 65–72°F): Produces a lightly tangy, fresh-tasting kkakdugi. Good for those who prefer a mild fermented flavor.
- 24–48 hours at room temperature: More pronounced sourness, deeper umami, the garlic and ginger integrate further.
- Refrigerator phase: After your room-temperature fermentation window, transfer to the fridge. Cold slows fermentation dramatically. Best flavor is at 3–5 days refrigerated. Good texture and flavor hold for 3–4 weeks in the refrigerator.
How to Serve Kkakdugi
Kkakdugi is most classically served as a banchan (small side dish) alongside plain rice and soup, particularly the mild, milky broths — gomtang, seolleongtang, or yukgaejang — where its sharp crunch provides essential contrast. It's also excellent alongside grilled meats and as part of a spread of side dishes.
The brine that collects at the bottom of the jar after a few days is not waste: it's a concentrated, flavorful liquid that can add depth to soups, stews, and dipping sauces. It pairs beautifully as a condiment alongside bossam (boiled pork belly). For a fuller picture of how to build a banchan spread and what roles each dish plays, our banchan guide walks through the essentials.
Common Mistakes to Avoid
1. Choosing a Light or Spongy Radish
The single biggest quality variable in kkakdugi is the raw ingredient. A radish that feels light for its size almost certainly has internal air pockets or dry, porous flesh — and no amount of careful technique will produce crunchy kkakdugi from that starting point. Before buying, press the radish firmly: it should feel dense and completely unyielding. A hollow-sounding thud when tapped is a warning sign. If using daikon as a substitute, expect a slightly wetter result and watch the salting time — daikon sheds moisture faster than Korean mu.
2. Over-Salting or Salting Too Long
The salting step is about controlled moisture extraction, not brining the radish to the point of collapse. Over-salting — whether from too much salt or from leaving the radish in salt for too long — produces cubes that go limp and stay limp. Fermentation does not reverse texture loss at this stage. If you check at 45 minutes and the cubes already feel floppy and almost translucent throughout (not just at the edges), drain immediately and reduce salt quantity next time. The target is firm-at-the-core, slightly yielding at the surface — not collapsed.
3. Measuring Salt by Volume With the Wrong Salt Type
Coarse sea salt, coarse kosher salt, and fine table salt are drastically different in density. One tablespoon of fine table salt contains roughly twice the salt mass of one tablespoon of Korean coarse sea salt. If you're substituting a different salt, weigh it: aim for approximately 18g for 900g of radish. Using table salt measured by the tablespoon will produce brutally over-salted, bitter kkakdugi that cannot be rescued by rinsing without also losing the texture.
4. Leaving Air Pockets in the Jar, or Overfilling It
These are opposite errors that lead to the same category of problem. Loose packing leaves air gaps where exposed surfaces dry out and the paste fails to season the radish evenly — you'll find pale, flat-tasting cubes near the top when you open the jar. Overfilling means the liquid released during fermentation overflows (making a vivid red mess on your refrigerator shelf) and the radish at the top gets pushed up and out of the brine. Pack firmly and leave that 2.5 cm (1 inch) of headspace.
5. Using the Fine-Grind Gochugaru Instead of Coarse
Fine gochugaru is used in pastes like gochujang and in soups where a smooth texture is desirable. In kkakdugi, it coats the radish in a thick, opaque layer that looks muddy and pastes over the cubes rather than seasoning them. The coarse grind gives the paste texture, clings better to the cubes without smothering them, and gives the finished kkakdugi its characteristic speckled, vivid red appearance. If the bag you bought doesn't specify, look at the flake size: coarse should look like small dried chili flakes; fine should look like a powder.
6. Eating It Straight From the Mixing Bowl
Freshly made kkakdugi tastes raw — the garlic is harsh, the fish sauce and shrimp are front-and-center rather than integrated, and the gochugaru's heat feels unrounded. Even 12 hours of room-temperature fermentation makes a striking difference. The bacteria get to work converting sugars, the garlic mellows considerably, and the various salty-umami elements start tasting like a single coherent flavor rather than several competing ones. It's worth tasting a cube right after mixing (as a benchmark) and again after 24 hours in the refrigerator. The transformation is instructive and genuinely satisfying to observe.
Frequently Asked Questions
Can I make kkakdugi vegan or vegetarian?
Yes. Replace the anchovy fish sauce with soy sauce or a vegan fish sauce alternative — some Korean grocery stores now carry specifically labeled vegan kimchi base sauce. Omit the salted fermented shrimp entirely, or substitute a small amount of miso dissolved in water (about 1 teaspoon white miso in 2 teaspoons water) for some of the umami depth. The flavor profile will be somewhat less complex and deeply savory, but a well-seasoned vegan kkakdugi is genuinely good and very much worth making.
My kkakdugi smells quite sour after a day at room temperature. Is that normal?
A tangy, lactic sour smell after 12–24 hours is exactly the sign you want to see — fermentation is working. The smell you're looking for is bright and clean, like yogurt or sourdough starter, not musty or putrid. Very occasionally, kimchi can develop off-notes if equipment wasn't clean or salt levels were too low (which allows unwanted bacteria to compete). If something smells genuinely wrong — ammonia-like, sulfurous in an unpleasant way, or just plainly foul — trust your nose. But normal active fermentation smells unmistakably alive and sour, not rotten.
How long does kkakdugi keep in the refrigerator?
Well-made kkakdugi maintains good crunch and balanced flavor for about 3 to 4 weeks in the refrigerator. After that, it continues to ferment slowly: the cubes gradually soften and the flavor becomes more intensely sour and complex. This older, heavily fermented kkakdugi is not ruined — in Korean cooking it's valued for use in cooked dishes. Roughly chop well-aged kkakdugi and stir-fry with rice for a deeply flavorful kimchi fried rice, or use it as the base for a quick kimchi jjigae.
Can I use daikon instead of Korean radish?
Daikon is the best widely available substitute and produces decent results. The main differences: daikon has higher water content (it may shed more liquid faster during salting — check at 40 minutes rather than waiting the full hour) and a milder, slightly less sweet flavor than Korean mu. The finished kkakdugi will be slightly less crunchy and may have a more watery brine. Still very much worth making if Korean radish isn't available. Avoid small salad radishes or purple radishes — they're a completely different species with a much more pungent flavor and won't work here.
Do I need to "burp" the jar during fermentation?
If you're using a fully airtight lid, it's a good idea to briefly open the jar once or twice during the room-temperature fermentation phase to release any built-up gas pressure. Some cooks leave the lid slightly loose during those first 12–48 hours for exactly this reason. Once the jar moves to the refrigerator, fermentation slows to the point where gas buildup is minimal and burping is no longer necessary for normal 3–4 week storage. ```